


From an article by James Delahunty in AfterDawn. It’s the best explanation of this problem that I’ve seen. This is important news and is reprinted here as a public service:
FBI deadline may see thousands of Internet users unable to browse web.
These users have been affected by malicious software (dubbed DNSChanger, which uses TDL4 rootkits and a bootkit to protect itself) that, among other nasty deeds, changes DNS settings on their PCs, Macs and maybe even wireless routers in order to present a spam-filled altered version of the Internet.
The FBI took down the rogue operation in November 2011 (Operation Ghost Click), but after it was found that hundreds of thousands of users were using the rogue DNS settings without knowledge, the decision was made to put clean DNS servers online using the same IP ranges as the malicious servers.
That bought infected users some time to detect and fix the problem. However, even with the support of giants like Google (which alerts some users in search results if their DNS settings appear altered), there are still reportedly hundreds of thousands of users worldwide who rely on the DNS servers – which are due to be disconnected on Monday, July 9.
If your DNS Settings are the notorious ‘Rove Digital’ DNS settings, then your web browsers and other applications will lose the ability to carry out DNS lookups. Essentially, this means you will not be able to find the real location of websites when you type in domain names like www.afterdawn.com. You will get an error message like the one shown above.
This might not only affect a single infected computer. If your computer is connected to a router (including wireless), then the malware may have also altered the DNS settings of your router. If so, that means everything that connects through your wireless router (smartphone, Xbox 360, PS3, tablet, laptops etc.) will also be affected, even if they are totally clean of malware.
The only way to avoid this problem is to restore clean DNS settings. This might be more complicated than it sounds, because if your system is currently infected by the tedious malware, it may simply restore the bad DNS server settings once you try to change them. For this reason, you need to detect whether you are affected, then clean the infection and then change the DNS settings. To be clear, Wireless Routers are not infected by this malware, they simply have their DNS settings changed (if you use the default login/password combination, as most users do.)
So let’s get started with detection.
Detect if DNS settings have been changed.
The easiest way to ensure that your DNS settings have not been changed to the Rove DNS servers is to try visiting a webpage that will determine if you are affected. We recommend that you visit http://www.dns-ok.us. You will either get a GREEN or RED result for DNS resolution. If you got a RED result, then you need to take action now.
Even if you received a GREEN result, it is possible that your ISP is redirecting DNS traffic, in which case you might still be infected with the malware (and your DNS settings might still be wrong) so take the following steps to manually confirm if you have been affected by this malware.
To manually check if you are affected by DNSChanger, we need to check what the DNS settings are on your PC or Mac, and check to see if they fall into any of the following ranges.
- 85.255.112.0 – 85.255.127.255
- 67.210.0.0 – 67.210.15.255
- 93.188.160.0 – 93.188.167.255
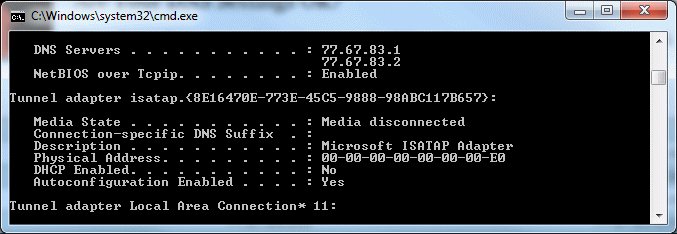
- 77.67.83.0 – 77.67.83.255
- 213.109.64.0 – 213.109.79.255
- 64.28.176.0 – 64.28.191.255
The above ipconfig read-out shows that the primary DNS server is 77.67.83.1, which falls into the range 77.67.83.0 – 77.67.83.255. This is a bad result and shows that this PC has been affected by the malware. So check your own computer manually following instructions below.
Check DNS on Windows XP
- Click Start Menu.
- Click Run.
- Type ‘CMD’(without quotes).
- Type ‘ipconfig /all’(without quotes) and press Enter.
- Look through the results for Local Area Connection settings. Find ‘DNS Servers’.
- If the DNS server ranges match any of the malicious ranges shown above, then you are affected.
Check DNS on Windows Vista / 7
- Click the Orb/Start Menu.
- Type ‘CMD’into the search box (without quotes).
- Run CMD.exefrom the results.
- Type >‘ipconfig /all’(without quotes) and press Enter.
- Look through the results for Local Area Connection settings. Find ‘DNS Servers’.
- If the DNS server ranges match any of the malicious ranges shown above, then you are affected.
Check DNS on Mac OS X
- Click the Appleicon on the Desktop (top left).
- Click System Preferences.
- Open the Networkpreferences.
- The DNS Server information will now be shown. If either IP fall within the malicious ranges shown above, then the system is affected.
It could be possible that you get a good result here, but still are warned by DNS-OK.us that you are affected. If that’s the case, then your wireless router might just be the problem.
Is my Wireless Router affected?
Checking your Wireless Router is a little bit more complicated. You need to be able to see your wireless router settings, and this varies from model to model. Most routers will let you change settings through a web-interface, provided that you are connected to the router, know its IP address on the network and have the correct login information. For most users, this information will all be default unless you have decided to change it manually.
NOTE: If you have previously changed the login user name and password of your router, then it is highly unlikely that the DNS settings have been altered by any malware. The DNSChanger variant will only be able to change these settings if the routers username and password are the default settings.
To connect to the web interface of your router, you need the default information (or information provided by your ISP). If you have manuals or other information provided with the router then use that. Also, some ISPs will include this information (along with the Wi-Fi access key etc.) on a sticker on the underside of the router they give you. If you still cannot find the relevant information, then check this Default Password List, and use ipconfig /all again to determine the router IP (find the default gateway) and enter that into your browser.
Once you are able to check your Router settings, try to find the DNS settings (often time, you till find it under Network – WAN, but all routers vary). If your Router is set to retrieve all information via DHCP, then you are most likely OK, since the Router will retrieve the DNS IP addresses directly from your ISP. This won’t always be the case though, and if you find DNS servers are manually set in the router and fall into the ranges shown above, then you will need to either change them to your ISP’s settings (or set to DHCP / automatically retrieve settings) or to a public settings like Google DNS (8.8.8.8 and 8.8.4.4).
NOTE: Unfortunately, not all routers will be this easy to check, and you may need to contact your ISP if you are concerned about whether your router is affected. Otherwise, Google for information on your router model and find out how to change the settings. Be careful when resetting a router or restoring defaults, as you could end up with an unsecured network.
Removing the Malware infection
NOTE: This article only suggests measures that may free you from the malware infection responsible for the DNS server changes. AfterDawn accepts no responsibility for any negative consequences if you follow the advice below. Be smart and create a backup of personal files and anything else that might be important to you in the case that you might end up needing to re-install your operating system later to resolve the problem. Also, if you know a relative or friend that has more experience than you, bite the bullet and ask them to do this instead.
Options for Windows
Since the DNSCHanger malware is associated with the TDL4 (TDSS, Alureon) rootkit, which also affects boot options, TDSSKiller from Kaspersky can help with the removal process. Using TDSSKiller, you can detect and remove stubborn rootkit infections, as well as cure a bootkit. While this might not fix the problem for you right away, it will fix some really annoying things, such as the inability to use security software you may already have installed, or to download Windows and anti-virus updates.
Download TDSSKiller from:
http://support.kaspersky.com/faq/?qid=208283363Running TDSSKiller is simple. Just run the utility and click Scan and let it do its thing. In Windows Vista / 7 you may need to right-click on the TDSSKiller executable and click Run as Administrator for it to work properly.
If the utility finds and removes nasty rootkits and bootkits from the system, you will still need to run other general anti-malware utilities to ensure the system is clean before switching the DNS settings back to automatic, or whatever you’d prefer.
Tools you can run after TDSSKiller that will help include…
You should also make sure to install a security product, such as Avast Anti-Virus or AVG to help clean up any remnants of malware infection and to help prevent infection in the future.
DNSChanger Removal for Mac OS X
SecureMac offers a free DNSChanger Removal Tool for Mac OS X users. The tool will remove the OSX.RSPlug.A Trojan Horse and restore the DNS records (after a reboot).
Download the DNSChanger Removal Tool for Mac OS X from:
http://macscan.securemac.com/dnschanger-trojan-removal-tool-for-mac-os-x/Restore safe DNS Settings
NOTE: Some security software you have previously run may already have restored your DNS settings.
Once you are confident your system is now free of the malware that causes the DNS changes, you can now manually change the DNS settings yourself.
Change DNS on Windows XP
- Click Start.
- Open Control Panel.
- Switch to Classic View and open Network Connections.
- Right-click on your active Local Area Connection, click Properties.
- Select ‘Internet Protocol (TCP/IP)’ and click Properties.
- In the General tab, select Obtain DNS server address automatically OR manually enter your ISPs Preferred and Alternative DNS server IP addresses if you have them OR
- If you do not have your ISP’s DNS server addresses and automatically obtaining then is not working, then try 8.8.8.8 and 8.8.4.4 to use Google’s public DNS servers instead.
- Click OK and Apply settings.
Change DNS in Windows Vista
- Click the Start / Orb menu button.
- Click Control Panel.
- Switch to Classic View and open Network and Sharing Center.
- Click Manage Network Connections.
- Right-click active Local Area Connection (or other active connection) and click Properties.
- Select Internet Protocol (TCP/IPv4) and click Properties.
- In the General Tab, select Obtain DNS server address automatically OR manually enter your ISPs Preferred and Alternative DNS server IP addresses if you have them OR
- If you do not have your ISP’s DNS server addresses and automatically obtaining then is not working, then try 8.8.8.8 and 8.8.4.4 to use Google’s public DNS servers instead.
- Click OK and Apply settings.
Change DNS in Windows 7
- Click the Start / Orb menu button.
- Click Control Panel.
- Switch from Category View to Large Icons in the top-right, and then open Network and Sharing Center.
- Click ‘Change Adapter Settings’on the left.
- Right click on the Local Area Connection or Wireless Network Connection (depending on which is there, or which you are using), and click Properties.
- Under the Networking tab, select Internet Protocol Version 4 (TCP/IPv4)and click Properties.
- In the General Tab, select Obtain DNS server address automatically OR manually enter your ISPs Preferred and Alternative DNS server IP addresses if you have them OR
- If you do not have your ISP’s DNS server addresses and automatically obtaining then is not working, then try 8.8.8.8 and 8.8.4.4 to use Google’s public DNS servers instead.
- Click OK and Apply settings.
Conclusion
Hopefully the information here will be helpful to some users. If you still have problems after trying out the information above, most ISPs should be more than willing to help if you try contacting a call center. Hopefully you will not turn out to be one of the unfortunate victims of this malware saga on Monday, July 9.


(Via AfterDawn.com.)


